Light-Up Paper Circuits Mural at Maker Faire!

This year at Maker Faire, the Nueva I-Lab team and I pulled out my favorite trusty, easy-to-prep maker activity to offer at our school’s booth. We joked that essentially, we were asking visitors who stopped by our booth to build our sign for us as the Faire went on. πŸ™‚

Many parents and teachers who came by asked about how to do this activity back home, so here’s my very quick set of notes:

Prep

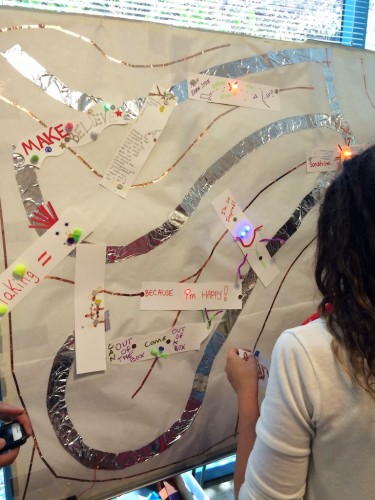
Prepping for this activity took maybe an hour or so. First, you have to plan out what design you want to use as your mural backing – I kept it simple with spelling out our school’s name.

Then you have to plan out how you will lay down parallel positive and negative tracks that follow this design. For letters like U, V, and N, this was pretty easy. For letters like E and A, you have to plan strategically and be prepared to use non-conductive tape like Scotch tape, masking tape, or electrical tape (which is actually not conductive despite its confusing name) to insulate junctions to prevent short circuits. If that last sentence made zero sense, choose an easy design like U, V, N, (or C, D, I, J, L, M, O, S, W, Z) for your first go. You can sort of see how I laid out my letters in this photo:

Once you have planned it out, sketch out your plan on your mural backing surface in pencil, so you have something to follow as you are laying down the copper tape.

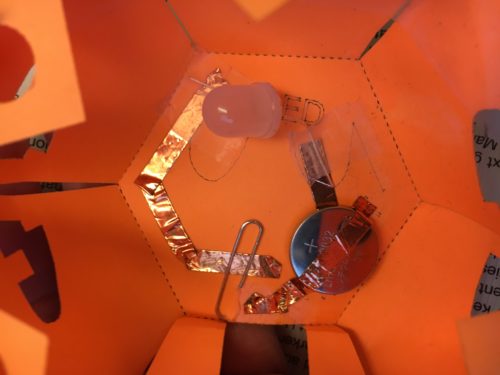
Then you will apply the copper tape to create the two parallel tracks. I usually use a thicker piece of tape for the positive track and a thinner piece of tape for the negative track – this is only for aesthetic (and remembering) purposes because the tape will conduct electricity just fine however wide it is. Try not to break the tape to round corners and instead use a folding technique. (The always-wonderful Jie Qi has some great tips about how to round corners without tearing the copper tape.) If you have to connect two separate pieces of copper tape, I usually assume the adhesive side is not conductive and do a fold-under, followed by another piece of tape on top to secure, to make sure the shiny sides are in contact. (Again, Jie Qi has great tips for this too.)

Once you have finished creating the design, figure out where you want to place the battery pack. Place the red wire in contact with the thicker copper tape track on the mural backing and place the black wire in contact with the thinner one. You may need to strip the two wires from the battery pack to expose more wire. Secure with tape and/or thumbtacks. If you want to get fancy, you can even solder these wires onto the copper tape surface. Anything to make a strong electrical connection. You will also need a way to mount the battery pack – Velcro works well but so does a loop of duct tape or even a giant clip of some sort.

Grab a plain LED and test out your mural backing to make sure it’s getting power (remembering that LEDs have a positive and negative leg, so if it doesn’t light up right away, flip it around and test again), and then you are good to go

Supplies

Here’s the list of stuff I usually buy for this activity – for something like Maker Faire which is about 2.5 days of a constant stream of visitors, I think we went through about 200-300 LEDs (a small number of the packs will be defective).

  • Fast cycling LEDs – these wonderful LEDs are already built to cycle through different colors without extra logic or coding. Sparkfun and Adafruit sell these but lately, I have preferred to order them from Amazon in bags of 100. I recommend the fast cycling versus the slow cycling because they are much more “blinky!”
  • Two-AA battery packs and AA batteries: The LEDs above run on about 3V, so you will need battery packs that hold two AA batteries. Get the packs with on/off switches so it’s easy for you to cut power to the whole mural at once.
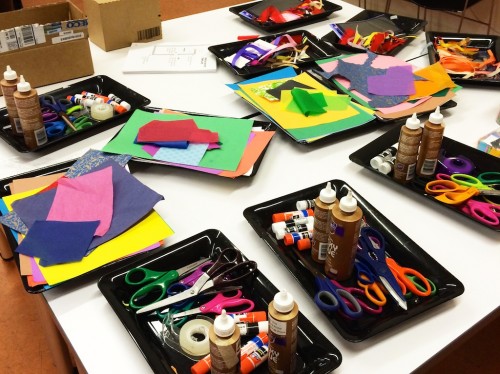
  • Copper tape: The width of the copper tape has no bearing on its function. But I generally prefer to buy a roll or two of the 1-inch wide copper tape for creating the mural backing. I also buy many more rolls of the more normal 1/4-inch wide copper tape, which is what kids will use to create their pieces before adding to the mural. Pro tip I learned from a 6th grade colleague at my previous school: To avoid a messy tangle of tape falling off the roll literally 5 seconds after the activity starts, pre-cut short strips of tape so kids just grab from these for their project.
  • Paper surface: If you are doing this at your school, you can easily just layer some butcher paper or poster paper on top of an existing bulletin board and then create your mural backing directly on it. I am personally a fan of this black railroad board (blinky lights stand out well against a dark background) but really any surface will do.
  • Thumb tacks: While I hate old-school thumb tacks as much as the next person because they are so hard to pry off, they work really well for this project because they are usually also conductive and so can help with making an electrical connection between the mural backing and the mural pieces on top.
  • (Optional) Cork/foam boards: Because we were doing this at Maker Faire, we needed a portable version of a bulletin-board-like surface. I used to use plain foam core but found that thumb tacks don’t stay in very well. After many iterations of this project, the best solution I’ve found so far is these cork-lined foam core boards. For some reason, they have gotten more and more expensive, so again, if you have a bulletin board to do this at your school, then please skip this step. Otherwise, it’s $$$ but at least you can reuse these for years to come.
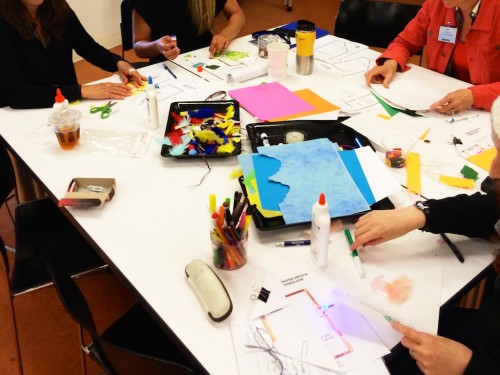
  • Craft supplies: I prefer to keep things simple in this category and just limit it to fun papers, markers, scissors, Scotch tape, and glue sticks (not hot glues since that would be a nightmare to supervise at an event like Maker Faire). For paper, I love love love to buy packs of scrapbook paper – Colorbok is a major brand and Amazon sell 12″x12″ or 8.5″x11″ pads of these in a bazillion fun patterns for very reasonable prices. I usually just get whatever is cheapest. Regular old construction paper is also a great standby. I also recently found out there are these construction paper packs that have pre-scored shapes on them — great for very little kids who may have trouble using scissors. If you want to offer more crafting choices, pom poms would be a great addition. But remember to avoid anything that might have conductive materials such as pipe cleaners, glittery materials, ribbons with metallic threads, etc.

The Activity

Once you are prepped and have all the supplies, let the fun begin! I filmed an instructional video for what your participants would have to do, so that’s probably the easiest way to explain it.


Continue Reading

a paper circuit jack o’ lantern

Note: Here is the original Instructable this project is based on.

Here are our templates for the top and bottom of the lantern (right-click to save the SVGH files and then open in Inkscape). Red lines are cut or score lines (scoring already drawn as dashed lines) – you can also just print this out on a regular ink printer and cut out the solid red lines with scissors/x-acto knives and fold along score lines.

The blue lines are “vector engraved” on our laser cutter (or again, just printed in a different color on an ink printer) and really just serve as a guide when wiring up the electronics (or where to color in the pumpkin stem on the top). The electronics diagram shows where I suggest placing the LED (and which side is positive) and where I suggest putting the coin battery.

Student workflow:

  1. Put down two strips of copper tape on the solid blue lines
  2. Add the LED (paying attention to which side is positive) and coin battery (positive side facing up) on top of the copper tape and secure those components with Scotch tape
  3. Use the dotted blue line as a guide for the final piece of copper tape, which should go on top of the battery (If your copper tape’s adhesive side is not conductive, then you will need to fold over this copper tape so that the metallic side touches the top of the coin battery and secure THAT down with more Scotch tape)
  4. The little square door on the bottom template will be where you can slide in a paper clip to complete the circuit and turn on the LED.

Photo above shows the completed circuit. The paper clip currently doesn’t complete the circuit, so that’s why the LED is dark. If you move the paper clip to the right a bit, so it bridges the gap between the two copper tape tracks, then circuit will complete and … candle flicker!

Supplies you need:

  • laser cut or printed templates on cardstock
  • Coin cell batteries (I usually buy in bulk from Digi-Key (Product# P189-ND))
  • Copper tape (I usually buy from Sparkfun, but you can also get from Digikey 3M1181A-ND or look for “Slug Tape” at Home Depot/Amazon)
  • Scotch tape
  • Paper clip (acts as a switch in this circuit!)
  • LEDs – we bought 10mm yellow candle flicker LEDs from Evil Mad Scientist because we liked the candle effects
Continue Reading

a twinkling star (and a non-twinkling one too)

Hurray! I finally found time to play with Circuit Stickers!

As much as I love the cuteness of the Circuit Sticker Sketchbook, I’m pretty stingy and wanted to use the stickers for a project in my own notebook instead. So I quickly sketched out a star pattern with pencil, to have as a guide for laying down copper tape. Because I wanted to light 5 LEDs, I needed to wire them in parallel, which is why there are two separate traces on the star. The inner trace is negative and the outer trace is positive.

From there, I wanted to play with the effects stickers, so I watched some of Jie Qi’s tutorial videos. I first tried to add a Twinkle sticker and another LED sticker in the middle of the big star, but space got way too tight. (You can see the random bits of copper tape leftover from experimenting with this configuration in the video.) But since I already had a star, I thought why not add a twinkling star next to it? The wiring here was a bit trickier because I had to cross the positive rail over the negative of the original big star in order to reach the blank part of the page. So I insulated with some Scotch tape to make sure the circuit isn’t shorting. Also because of where the negative and positive terminals of the Twinkle sticker are, I ended up having to run the signal wire past the two terminals under the sticker (again, insulating with some Scotch tape to make sure wires aren’t accidentally crossing).

End result? I love Circuit Stickers! I’m not convinced that they’re scalable for large groups of students – while not super expensive, they do cost more than just buying plain LEDs and batteries (obviously, since they have to be custom-made). But I would buy sets of these as gifts for kids in a heartbeat! Speaking of which, there is a Heartbeat sticker too….!

Continue Reading

a resource page for paper circuits

One of my absolute favorite making projects is paper circuits. TheyΒ  are cheap, simple, don’t require any fancy equipment or supplies, and easily adaptable to all sorts of contexts and interests. Once people get the gist of how to make a simple paper circuit, there are many directions they can go: make more complicated circuitry, create interactive stories or posters, incorporate paper circuits into origami or sculptures, etc. The possibilities are nearly endless!

A very basic activity is to make a light-up greeting card or to “bling” out a notebook with a paper circuit on the cover. And Jie Qi, a former(?) grad student at MIT Media Lab’s High Low Tech group, who has done a bunch of work on paper circuits, has recently released a fun Circuit Stickers kit based on the ideas of paper circuitry. While Circuit Stickers are likely not feasible in a classroom setting, they would be fun to buy as toys for kids to play with at home.

Jie also is the one who created the most incredible and lovely interactive painting using paper circuits.

Interactive Light Painting: Pu Gong Ying Tu (Dandelion Painting) from Jie Qi on Vimeo.

At a conference recently, I saw a fabulous application of paper circuits from the folks at the Exploratory where everyone collaborated on a paper circuit mural. The main difference here is that someone preps a large surface ahead of time with a positive rail and a negative rail (hint: use copper tape for one and aluminum foil for the other to easily tell them apart), hooks them up to battery pack(s) for power, and then gives everyone the materials to create paper circuit pieces to add to the mural. Pieces can be attached using pushpins or magnets, depending on what the backing of the mural is.Exploratory Paper Circuits Exploratory Paper Circuits Recorder

Useful links:

  • Exploratorium’s Tinkering Studio‘s main project page for paper circuits has great examples, suggestions on where to buy supplies, and a PDF activity guide.
  • The Tinkering Studio wrote a blog entry on paper circuits that has great tips on facilitation strategies and common challenges.
  • High-Low Tech group’s site has an online tutorial and a one page handout with templates and materials list, including part numbers for Digikey, which is a cheap vendor for electronics materials.
  • The fabulous Lindsey Own, who ran a workshop session on alternative circuits with Jenny Howland at the professional development event we ran back in June, has a nice blog entry with tips and tricks for working with paper circuits.

Tips & tricks:

  • Any 3V coin cell batteries will work. I usually buy CR2032 because I can use them for other things too and I like that they’re pretty flat.
  • For the most part, I use regular two-legged LEDs but I have since learned about using surface mount LEDs for tiny lights that lay flatter on the page or LEDs with axial leads for easier wiring.
  • Copper tape can be bought from hardware stores as snail tape or EMI shielding tape from electronics stores. Tinkering Studio has some tips on which brands are best.
  • Instead of taping down the leg of an LED onto the paper, first lay down a piece of copper tape. Put the leg on top and then tape that down with another smaller piece of copper tape. This will ensure that the metallic leg of the LED has good contact with the shiny, more-conductive side of the copper tape.
  • As much as possible, avoid creating circuit paths with multiple pieces of tape and instead, turn corners with one piece of tape. This will ensure good current flow.

Stuff to buy:

Continue Reading

a paper circuit mural

Yup, I’m pretty much obsessed with paper circuits lately, so here they are making yet another appearance!

For the past two days, I’ve been over at Lighthouse Community Charter School’s Creativity Lab helping out with some professional development workshops they’re running. When Aaron and I were brainstorming how to structure the day, one of the things he really wanted was to kick off the morning with some active making. I mentioned that at the Making Possibilities workshop a while back, I saw a really cool adaption of paper circuits where everyone collaborated on a mural. When he presented this to his team back at LCCS, they liked the idea and immediately work on making the mural base for it.

After breakfast on day 1, we asked participants to create pieces to add to the mural. The activity became both an ice-breaker and the mural itself became like a “water fountain” as people gathered around to chat about electricity or what not. The funniest moments were when someone accidentally shorted the mural, turning everyone’s lights off, and the whole group would all gasp!

IMG_1599

And here’s my little contribution to the mural. I know I know, I wasn’t feeling super crafty that morning so I just turned to an old favorite. πŸ˜‰

IMG_1597

Continue Reading

a workshop on paper circuits

Funny thing: one of my good friends’ sister is apparently the Director of Education over at the Contemporary Jewish Museum and I never even knew it! To be fair, she also didn’t know what I do because every time we see each other at parties, we would just talk about food and cooking – another shared interest of ours. πŸ™‚

So when she found out what I do for a living, she graciously invited me to host a session on making in education at the Jewish Educational Technology Institute. And as a bunch of us maker lab directors like to say, one should never just tell people about making but make sure they experience it for themselves. To keep things simple, fun, and crafty, I decided to do a workshop on paper circuits especially since the attendees were mostly humanities teachers and I think paper circuits have great potential to integrate into the humanities.

The crew at CJM was so awesome and ordered all the supplies we needed the week before (while I was away at CMK 2014). They also dug up a whole bunch of craft materials from their stock room to ensure maximum making fun!

IMG_1589

For the first timers, I suggested that they start with the simple circuit template from Jie Qi’s Circuit Stickers Sketchbook. From there, they could try making a circuit with a switch or even more complex circuits.

IMG_1590


Continue Reading